Parallel projection
From Wikipedia, the free encyclopedia
|
|
This article needs additional citations for verification. (September 2009) |
| Part of a series on |
| Graphical projection |
|---|
 |
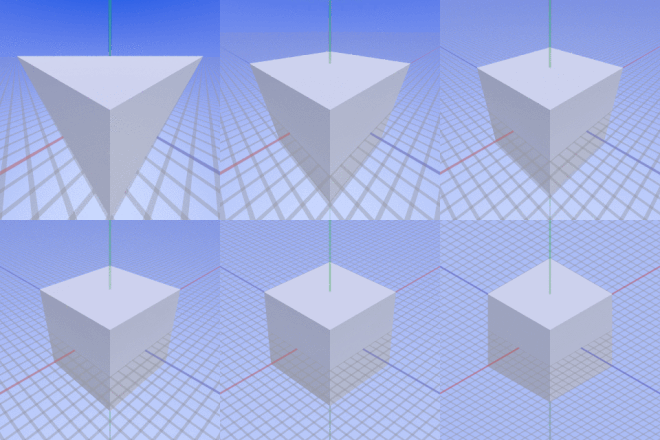
Parallel projections have lines of projection that are parallel both in reality and in the projection plane.[clarification needed]
Parallel projection corresponds to a perspective projection with an infinite focal length (the distance from the image plane to the projection point), or “zoom“.
Within parallel projection there is an ancillary category known as “pictorials”. Pictorials show an image of an object as viewed from a skew direction in order to reveal all three directions (axes) of space in one picture. Because pictorial projections innately contain this distortion, in the rote, drawing instrument for pictorials, some liberties may be taken for economy of effort and best effect.
Contents[hide] |
[edit]Orthographic projection
The orthographic projection is derived from the principles of descriptive geometry, and is a type of parallel projection where the projection rays are perpendicular to the projection plane.[1] It is the projection type of choice for working drawings.
The term orthographic is also sometimes reserved specifically for depictions of objects where the axis or plane of the object is also parallel with the projection plane (paper on which the Orthographic or parallel projection is drawn.[1]
[edit]Pictorials
[edit]Axonometric projection
Axonometric projection is a type of orthographic projection where the plane or axis of the object depicted is not parallel to the projection plane,[2][3][4] such that multiple sides of an object are visible in the same image.[5] It is further subdivided into three groups: isometric, dimetric and trimetric projection, depending on the exact angle at which the view deviates from the orthogonal.[1][4] A typical characteristic of axonometric pictorials is that one axis of space is usually displayed as vertical.
[edit]Isometric projection
In isometric pictorials (for protocols see isometric projection), the most common form of axonometric projection,[3] the direction of viewing is such that the three axes of space appear equally foreshortened, of which the displayed angles among them and also the scale of foreshortening are universally known. However in creating a final, isometric instrument drawing, in most cases a full-size scale, i.e., without using a foreshortening factor, is employed to good effect because the resultant distortion is difficult to perceive.[citation needed]
[edit]Dimetric projection
In dimetric pictorials (for protocols see dimetric projection), the direction of viewing is such that two of the three axes of space appear equally foreshortened, of which the attendant scale and angles of presentation are determined according to the angle of viewing; the scale of the third direction (vertical) is determined separately. Approximations are common in dimetric drawings.
[edit]Trimetric projection
In trimetric pictorials (for protocols see trimetric projection), the direction of viewing is such that all of the three axes of space appear unequally foreshortened. The scale along each of the three axes and the angles among them are determined separately as dictated by the angle of viewing. Approximations in trimetric drawings are common,[clarification needed] and trimetric perspective is seldom used.[4]
[edit]Oblique projection
In oblique projections the parallel projection rays are not perpendicular to the viewing plane as with orthographic projection, but strike the projection plane at an angle other than ninety degrees.[1] In both orthographic and oblique projection, parallel lines in space appear parallel on the projected image. Because of its simplicity, oblique projection is used exclusively for pictorial purposes rather than for formal, working drawings. In an oblique pictorial drawing, the displayed angles among the axes as well as the foreshortening factors (scale) are arbitrary. The distortion created thereby is usually attenuated by aligning one plane of the imaged object to be parallel with the plane of projection thereby creating a true shape, full-size image of the chosen plane. Special types of oblique projections are cavalier projection and cabinet projection.[2]
[edit]Limitations
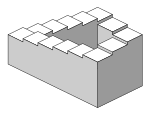
See also: Impossible object
Objects drawn with parallel projection do not appear larger or smaller as they extend closer to or away from the viewer. While advantageous forarchitectural drawings, where measurements must be taken directly from the image, the result is a perceived distortion, since unlike perspective projection, this is not how our eyes or photography normally work. It also can easily result in situations where depth and altitude are difficult to gauge, as is shown in the illustration to the right.
In this isometric drawing, the blue sphere is two units higher than the red one. However, this difference in elevation is not apparent if one covers the right half of the picture, as the boxes (which serve as clues suggesting height) are then obscured.
This visual ambiguity has been exploited in op art, including “impossible object” drawings. M. C. Escher‘s Waterfall (1961) is a well-known example, in which a channel of water seems to travel unaided along a downward path, only to then paradoxically fall once again as it returns to its source. The water thus appears to disobey the law of conservation of energy.


